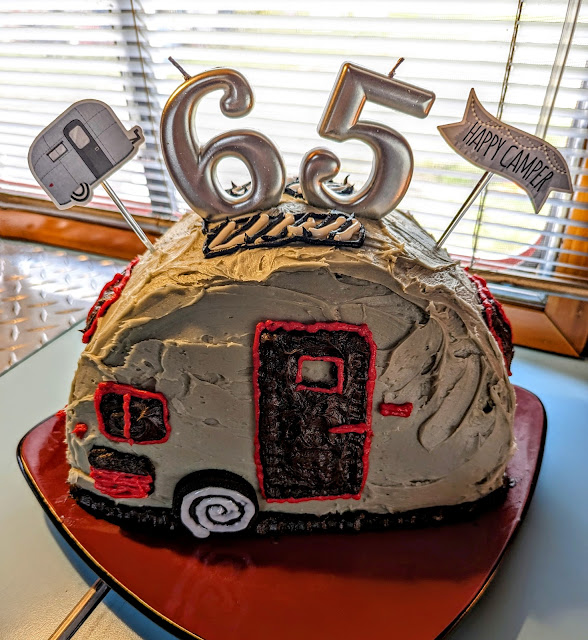
Favorite Recipes: Happy Camper Cake!
CHOCOLATE CAKE WITH BUTTERCREAM FROSTING
Homemade birthday cake without an oven? Absolutely! When we celebrated Hamlet's 65th birthday this year, we made him a special "canned ham" style cake. For those who are new to our story, we made a tiny replica of our solar powered, vintage 1957 Sportcraft travel trailer which we've lived and traveled in full-time since the fall of 2012. See more about our story here.
Typically, the cake takes about 6 minutes to mix by hand and 15-20 mins to bake. Hutch demonstrates a campfire baking process in our Gourmet Camp Cooking and Baking video (at 27 mins in). If you bake it over a 2 burner stove, you just need to bake it in between the 2-burners (set to low) and keep it turning every few minutes. Add some heat to the top every so often with a torch so that it bakes from the top down, then finish off the middle by moving it over to one of the burners and turn the heat up a bit. It takes some practice, but it's well worth it! Your nose and a clean toothpick in the middle will tell you when it's done, but it's generally about 15-20 minutes.
Since we were at the Mt. Saint Helen's Vintage Camper Rally and had many mouths to feed, we tripled this recipe, which is adapted from the Six Minute Chocolate Cake recipe in the Moosewood Cookbook. This cake is so easy to put together and so tasty, you may never go back to cake from at box. It can be made in an oven, of course, but it's best over a campfire, on our OTZI Flame Grill, or even on a 2-burner camp stove -- inside or outside of Hamlet. This recipe is also the base for our German Chocolate Cake recipe.
Check out more delicious recipes and subscribe to our FREE Almost Monthly Newsletter to get a new recipe (and lots more RV camping tips, hacks, and resources) in your inbox each month!
Chocolate Cake Ingredients
This recipe makes 1 layer of cake. You'll need to make 3 of these to create a Happy Camper Cake.
- 1 1/2 cups unbleached white flour
- 1/3 cup unsweetened cocoa powder
- 1 teaspoon baking soda
- 1/2 teaspoon salt
- 3/4 cup sugar
- 1/2 cup coconut oil, melted
- 1 cup cold coffee
- 2 teaspoons vanilla extract
- 2 tablespoons cider vinegar
P.S. This is a vegan cake, but trust us, you won't miss the dairy! We never tell anyone until they start raving how delicious and moist it is. And, it makes up for what you are about to smear all over it. ; )
Mix all dry ingredients together (you can pre-mix these ingredients at home and bring them in a food storage container).
Mix in all wet ingredients, adding the cider vinegar last. Stirring in the vinegar will lighten the color of the cake batter and cause it to rise and bubble.
Pour into a greased Fry-Bake pan immediately.
Cover and cook over a campfire for approximately 15-20 minutes, rotating occasionally. Note: Be sure to put coals on the top of the lid to cook from the top down as well.
Let cool completely before cutting into it.
Stack up the layers and cut a couple of inches off one side to create a flat edge.
Spread icing between the layers (see below for recipe) and press firmly to "glue" them together.
Gently stand the cake up on the flat side, again firming pressing layers together without crushing them.
Ice the entire cake with buttercream frosting.
Decorate as desired! We used Oreo cookies to make the wheels, then spiraled them with white icing. The rest of the cake was decorated with colored icing using various decorating tips.
This recipe makes enough for 1-2 layers of cake, depending on how thick you spread it. We doubled this recipe because we needed frosting in between the layers and we were covering 3 cakes. We had just a bit leftover, but not too much.
- 1 pound salted butter (softened, but not melted)
- 3.5 cups powdered sugar, sifted if clumpy
- 3 tsp Bourbon vanilla extract (this is the only vanilla we buy and we purchase it at Trader Joe's)
- 1-2 TBSP milk, if needed for thinning
- Cake icing food coloring, as desired.
Buttercream Frosting Instructions
While this is much easier to do with a mixer, we did it by hand this time around, mainly to prove that it could be done! It's so much better than frosting from a can; the extra effort was worth it. This recipe is adapted from The Best Buttercream Frosting by Two Sisters.
Drop 1 cup of softened butter in a large mixing bowl and break it up a bit.
Fold in the vanilla and stir, stir, stir until the butter starts to get creamy.
Slowly add sugar (about 1/2 cup at a time) and fold into butter until smooth. Add remaining powdered sugar and stir, stir, stir. Taste as you go as you can use more or less sugar depending on how sweet you'd like your frosting.
If frosting is too thick, add milk as needed.
Use immediately, no need to refrigerate.


Comments
Post a Comment