The Ultimate DIY Guide to Off-Grid Solar

Just the other day, we searched on YouTube for “DIY solar.” Not surprisingly, hundreds, if not thousands, of results filled the screen, scroll after scroll after scroll – it never stopped. There is literally a ton of information out there, almost too much, but there isn’t exactly a comprehensive one-stop guide where everything can be easily found now and referenced again, later. Maybe you really like the way one woman put panels on the roof of her van. Maybe she explained things in a way that totally made sense to you; but she didn’t make any other videos on the charge controller, battery, or inverter. You find yourself overwhelmed, discouraged and frustrated, so it's easy to give up. We realize how hard it can be to find quality information that is presented in an easy-to-follow and digestible manner for the solar curious.

We wrote this blog to specifically help you sail through the sea of information out there. We’ve been living mobile with solar since 2012, and have learned so much over these years on the road. In 2020, many people reached out to us asking for help to get started on their solar powered journey. As Renogy Solar Ambassadors, and life-long educators, we love helping people learn new things, and overcome preconceived limitations about what they think they can do. Like Renogy, we believe solar is for all, and if you can turn a screwdriver and follow a diagram, YOU can do some or all of your solar installation for yourself. Check out our RV Solar: To DIY or Not? video to assess if you are up for the challenge.
We’ve done the hard work for you by putting all of our favorite blogs and videos in ONE PLACE -- making this the ultimate resource as you begin your solar journey. We’ll break down our DIY advice around each component that makes up an off-grid solar panel system: solar panels, charge controllers, batteries, and inverters, in addition to a few other key products that don’t neatly fit into these categories. So bookmark this blog right now, because it’s about to become your new best friend to help you go from Solar Newbie to Solar Jedi! Note: This blog contains our affiliate links that can be combined with our promo code CANLIFE for 10% off non-sale Renogy products.
GETTING STARTED
First off, if you are brand new to solar, check out our recent blog, The Alphabet Soup of Solar Terminology. This will serve as a good overview before you jump into the specifics of each product below, and it will walk you through the necessary calculations you need to determine your total watt hours, which is the magic number you need to begin any solar installation.
Read:
Going Solar: The Complete Guide for New RVer’s
Watch:
Solar 101: A Beginner's Guide to Off-Grid Solar for RV's and Cabins
How to Install a Solar Paneled System on Your RV
Overview of Basic Solar Parts Needed
Introduction to Installing Solar in a Van
Basic Wiring Chart to Match Amperage, Length, and Gauge (AWG):


Here’s where it all starts – collect the sun’s photons and turn them into an electrical current. How many do you need? Depending on your energy needs, you may need just one panel or multiple panels. Panels come in various styles (rigid, flexible, portable), voltages (12V to 48V), and sizes (50W to 320W) and can be set up in series (for increased voltage) or parallel (for increased amperage). The type of panels you choose will depend on where and to what you are attaching them, or if you prefer a portable version (or both!). The size and number of panels will be determined by your energy needs and roof space. With so many choices, where do you begin? Here’s our “best of” selection of blogs and videos:
Read:
Selecting a Panel Style: Rigid, Flexible, or Portable
Busting Myths about Flexible Solar Panels
Installing & Attaching Different Styles of Solar Panels
How to Choose a Solar Panel Kit
Mounting a Rigid Solar Panel to an Uneven Fiberglass Roof
How Solar Panels Work -- A Colorful Animation
Watch:
Installing Portable Solar Panels on your “Solar Ready” RV
Installing Rigid Panels on a Roof Rack
Installing Rigid Panels to the Roof of an RV with 3M VHB Tape
How Flexible Solar Panels Work
Installing Flexible Panels on a Small Camper
Installing Flexible Panels to the Roof of an RV #1 AND Installing Flexible Panels to the Roof of an RV #2 (Note: Be sure to watch both!)
Wiring Solar Panels in Parallel
Wiring Diagrams:
Series vs Parallel (and Series-Parallel) Solar Panel Wiring Installations


The charge controller monitors and regulates the entire system -- it is the brain. In this case 2 (or more) brains really are not better than 1. Here, you need to select just one charge controller for your entire system. The type of charge controller will depend on the overall wattage of your system, whether or not you want to simultaneously use both your vehicle’s battery/alternator and solar panels (Dual Input DC to DC Charger) to charge your RV house battery while driving, and how you plan to use your system (how many days do you want to be able to go without good solar charging). Charge controllers come in various amperage sizes (10 to 100A) and styles (MPPT and PWM). What do these mean? Read on...
Read:
Choosing & Sizing a Charge Controller
What to Know about MPPT Controllers
Watch:
Simple Charge Controller & LiFePo Battery Installation (Note: We added a small fuse box and larger wiring after we created this video.)
How to Size Your Charge Controller
Renogy’s Rover MPPT Charge Controller Features
Charge While Driving: Installation of a DC to DC Battery Charger
Wiring Diagram:
Charge Controller Wiring Installation

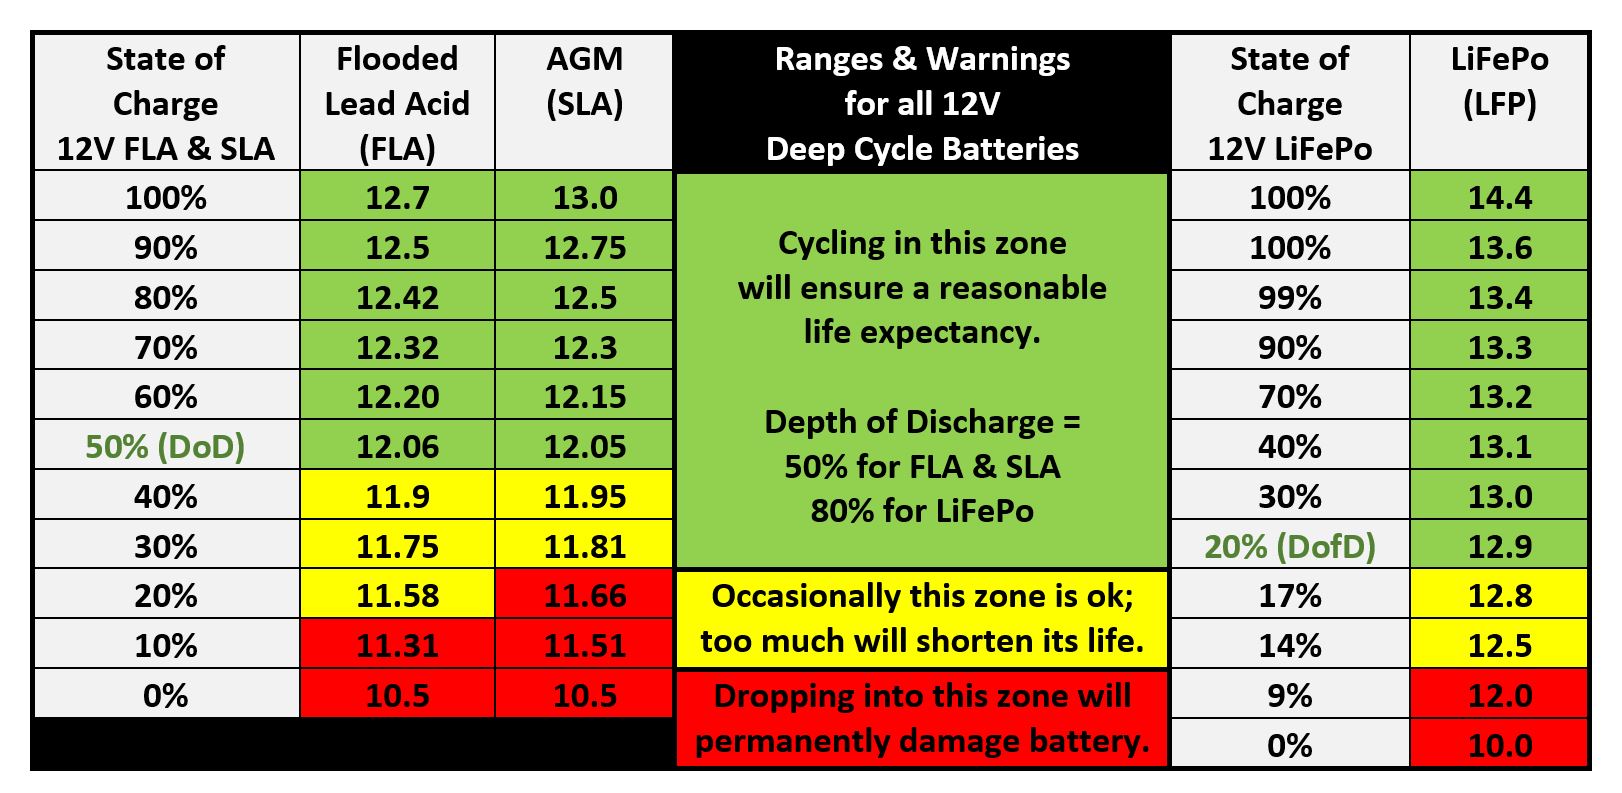
Simply put, batteries store the energy captured by the sun via your panels. The most popular deep cycle RV batteries styles are Lead Acid, AGM/Gel, or Lithium Iron Phosphate (LiFePo) -- in order of price from least to most expensive. Batteries range from 6V to 12V, and you can build 12V, 24V, and even 48V battery bank systems. Batteries are rated in amp hours, so you’ll see product labeling like 12V-100AH or 12V-220AH. Just like panels, most can be installed in series (for increased voltage) or parallel (for increased amperage). Note: Some batteries cannot be connected to each other in either parallel or series, so be sure to check with the manufacturer to be certain.

How many do you need? Depending on your energy needs and the size and style of your battery, you may need one battery or multiple batteries. They can also be the most expensive part of any solar powered system, so it’s important to know your battery options, especially if price is an issue. Here’s some information to help you make an informed decision:
Read:
Are Lithium Batteries Worth It? Cost Benefit of the Four Types of Deep Cycle Batteries
What’s the Difference between Starting, Dual Purpose, and Deep Cycle Batteries
Selecting the Right Battery for Your System
The Future of Solar: 48 Volt Systems
Watch:
LiFePo Battery & Charge Controller Installation (Note: We added a small fuse box and larger wiring after we created this video.)
LiFePo Battery Bank Install with Homemade Battery Bracket
Wiring Diagrams:
6V Batteries Wired in Series vs Parallel or Series/Parallel Combination
6V Batteries Wired in Series/Parallel Combination
12V Batteries Wired in Series vs Parallel
Battery Charge Status Chart & Article
Inverters play an essential role in helping us run the appliances we want to use (e.g., blenders, coffee makers, laptops, TV’s) by changing 12V DC power from your battery bank into 110V AC power that most of our appliances need to run. How many do you need? Typically you need just one inverter for your system. And, like all the other components of the system, they come in various styles (Pure Sine Wave and Modified Sine Wave) and sizes (700W-3500W). Here are some resources to help you make some decisions:
Read:
The Only Inverter Size Chart You'll Ever Need
Pure Sine Wave vs. Modified Sine Wave Inverters
Watch:
Wiring Diagrams:
Once you have your system installed, you’ll want to monitor the energy you are producing and using to make sure you don’t run out of power. Renogy has a couple of products that can be used individually or together, depending on your desire for detailed information and the sophistication of your system.

Battery Monitor vs Bluetooth Module: Watts the Best for your Solar Powered System?
Choosing a Bluetooth Module App

Watch:
Wiring Diagram for Battery Monitor Shunt:

**OPTIONAL WAYS TO RECHARGE YOUR BATTERIES
Mama said there will be days like these...and in our world, it’s days on end without sunshine. Again, Renogy has some awesome alternative solutions to make recharging your batteries a cinch. You can use these handy products individually or together, depending on your needs.
Read:
Using Shore Power to Quickly Recharge your Lithium Batteries (AC to DC Charger)
Using Your Vehicle’s Starting Battery to Recharge Your RV Batteries (DC to DC Charger)
Watch:
How to Effectively Charge Your RV Batteries While Driving
SPECIAL CONSIDERATIONS FOR SELF-DRIVEN VS. TOW-BEHIND RV’S:
Self-Driven (living space and engine in the same vehicle such as vans, buses, and motorhomes)
When you have an engine built into your living space, you can take advantage of the ability to charge your house battery without resorting to lugging around a gas powered generator. You can certainly use a battery isolator to charge while driving, but installing a DC to DC battery charger can greatly increase the charging voltage/amperage and greatly decrease the time it takes to recharge your house battery!

By installing a Dual Input DC to DC Battery Charger, you can charge your house battery even faster while driving down the road by simultaneously garnering energy from your vehicle’s starting battery/alternator (when the engine is running) and from your solar panels. This product becomes both battery charger and charge controller, all in one. The added convenience here is that when the house batteries are full and the panels are still collecting solar energy, they will trickle charge your starting battery so that you won’t have to worry about not being able to start your vehicle after two weeks in the desert.
The Best of Both Worlds: Installation of a Dual Input DC to DC Battery Charger -- Charge While Driving or Solar All in One Unit (Coming Soon!)
Tow-Behind RV (living space in a secondary vehicle towed by a car or truck such as 5th wheels, campers, and travel trailers)
Trailers can take advantage of the same charging opportunities as well, but require the ability to connect and disconnect quickly. After all, the whole point of using solar is to passively charge your batteries while you go out and play outside. Either of the DC to DC chargers mentioned above can be installed in the vehicle doing the towing, or in the trailer itself within close proximity to the house batteries. Just keep in mind that the longer the distance from the starting battery, the larger the gauge cable you will need to use to reduce voltage drop and increase safety. Many people use Anderson 4 Gauge Extension Cables to make a quick and easy connection between the trailer and the towing vehicle.
Wiring Diagrams:
DC to DC Battery Charger (manual, pg 16)
Dual Input DC to DC Battery Charger (manual, pg 14)
We hope this list of blogs, videos, and diagrams has been helpful to you. Check back with us on this blog, because we will continue to try and improve it as we find more helpful information. If you have further questions, please don’t hesitate to contact us via our website or social media listed below. And, be sure to follow our solar powered journey!

Shari Galiardi & David Hutchison have turned their higher education backgrounds, desire for life-long learning, and thirst for adventure travel into writing, photography, video production, and public speaking tours from coast to coast. Known to their friends as simply Shari & Hutch, you can learn more about their full-time, solar powered adventures on their website at freedominacan.com. Or, follow them on Facebook, Instagram, and YouTube as “Freedom in a Can, LLC.” Note: This blog contains our affiliate links that can be combined with our promo code CANLIFE for 10% off non-sale Renogy products.


Comments
Post a Comment